Difference between revisions of "Using the Camera Animation Tool"
(Created page with "<<This guide is currently under construction>> So you've made a super cool contraption that you want to show everybody, what do you do? Luckily, Contraption Maker has a movie...") |
|||
| Line 5: | Line 5: | ||
Static video is fine, but the latest Contraption Maker update added the CAT (Camera Animation Tool). This lets you define a path for the camera to take while it is recording your contraption. This allows you to make videos with a moving and zooming camera to follow the action around your contraption. If you prefer moving pictures to words, check out this short video giving an overview of how the system works. | Static video is fine, but the latest Contraption Maker update added the CAT (Camera Animation Tool). This lets you define a path for the camera to take while it is recording your contraption. This allows you to make videos with a moving and zooming camera to follow the action around your contraption. If you prefer moving pictures to words, check out this short video giving an overview of how the system works. | ||
| − | A note about the Camera Animation Tool: This tool does not currently work with mods. It only works with contraptions and puzzles. | + | '''A note about the Camera Animation Tool: This tool does not currently work with mods. It only works with contraptions and puzzles.''' |
Once you have a completed contraption ready to be recorded, you need to turn on the CAT. This is done in the puzzle options menu by checking the box marked CAT. This will add a new layer to your scenery panel called "camera layer." This layer is always on top, and cannot be moved around like other scenery layers. Your camera layers starts with one "camera keyframe." Select this keyframe to bring up it's animation panel. Animating the camera is done by adding "keyframes." These are specific positions that you want the camera to be in. When the contraption runs, the camera will automatically move between keyframes in order. | Once you have a completed contraption ready to be recorded, you need to turn on the CAT. This is done in the puzzle options menu by checking the box marked CAT. This will add a new layer to your scenery panel called "camera layer." This layer is always on top, and cannot be moved around like other scenery layers. Your camera layers starts with one "camera keyframe." Select this keyframe to bring up it's animation panel. Animating the camera is done by adding "keyframes." These are specific positions that you want the camera to be in. When the contraption runs, the camera will automatically move between keyframes in order. | ||
| + | |||
| + | [[File:CAT_option.png|300px]] [[File:Camera_layer.png|300px]] <br> | ||
| + | ''Checking the CAT box will create a new "camera layer" in your layers panel'' | ||
To create a new keyframe, click the yellow + button at the bottom of the animation panel. Drag your second keyframe where you want it to be. Now that you have two keyframes, you can run your contraption, and you will see the green recording area move between the two keyframes. You can use the speed slider to adjust how fast the camera moves between the two frames. | To create a new keyframe, click the yellow + button at the bottom of the animation panel. Drag your second keyframe where you want it to be. Now that you have two keyframes, you can run your contraption, and you will see the green recording area move between the two keyframes. You can use the speed slider to adjust how fast the camera moves between the two frames. | ||
| + | |||
| + | [[File:2_keyframes.png|500px]] | ||
Resizing the green camera area controls the zoom. If you want to zoom out and see more at once, drag the area to be larger. If you want to zoom in, drag the area to be smaller. If you set the camera to one size at keyframe #1 and another size at keyframe #2, it will gradually change sizes as it moves between the two frames. | Resizing the green camera area controls the zoom. If you want to zoom out and see more at once, drag the area to be larger. If you want to zoom in, drag the area to be smaller. If you set the camera to one size at keyframe #1 and another size at keyframe #2, it will gradually change sizes as it moves between the two frames. | ||
Revision as of 20:58, 6 October 2014
<<This guide is currently under construction>>
So you've made a super cool contraption that you want to show everybody, what do you do? Luckily, Contraption Maker has a movie recording tool built directly into the game. No need to download any external screen capture software. Contraption Maker records videos in the .webm format. Webm is a small video format that can be played in most video players, web browsers, and it is accepted by YouTube. Once a video is recorded, it can easily be uploaded directly to YouTube from the game.
Static video is fine, but the latest Contraption Maker update added the CAT (Camera Animation Tool). This lets you define a path for the camera to take while it is recording your contraption. This allows you to make videos with a moving and zooming camera to follow the action around your contraption. If you prefer moving pictures to words, check out this short video giving an overview of how the system works.
A note about the Camera Animation Tool: This tool does not currently work with mods. It only works with contraptions and puzzles.
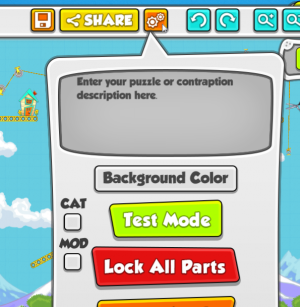
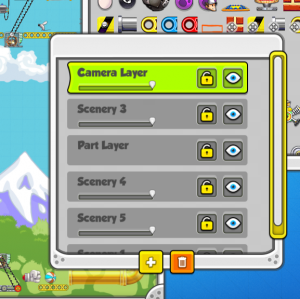
Once you have a completed contraption ready to be recorded, you need to turn on the CAT. This is done in the puzzle options menu by checking the box marked CAT. This will add a new layer to your scenery panel called "camera layer." This layer is always on top, and cannot be moved around like other scenery layers. Your camera layers starts with one "camera keyframe." Select this keyframe to bring up it's animation panel. Animating the camera is done by adding "keyframes." These are specific positions that you want the camera to be in. When the contraption runs, the camera will automatically move between keyframes in order.


Checking the CAT box will create a new "camera layer" in your layers panel
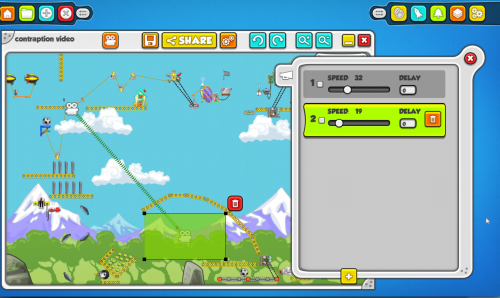
To create a new keyframe, click the yellow + button at the bottom of the animation panel. Drag your second keyframe where you want it to be. Now that you have two keyframes, you can run your contraption, and you will see the green recording area move between the two keyframes. You can use the speed slider to adjust how fast the camera moves between the two frames.
Resizing the green camera area controls the zoom. If you want to zoom out and see more at once, drag the area to be larger. If you want to zoom in, drag the area to be smaller. If you set the camera to one size at keyframe #1 and another size at keyframe #2, it will gradually change sizes as it moves between the two frames.
The "delay" field of a keyframe determines how long the camera will wait before it moves to the next frame. For example, if keyframe #1 has a delay of 2, it will wait on keyframe #1 for a count of 2 before it moves to keyframe #2. If no delay is set, the camera will move between frames without waiting.
Each keyframe has a little checkbox next to the number of the frame. Check this to enable a "jump cut." This will go from one frame to the next without showing anything in between. Instead of the camera panning from keyframe #1 to keyframe #2, it will instead "jump" directly to the new location.
These are all of the different ways to control the camera. If you want to test your camera movement at any time, just run the contraption and watch the camera move around your contraption. Once you are satisfied with your results, it's time to record the video. Click the orange camera button at the top of your contraption window to start recording. While recording, your contraption will look like it is running really slow. This is just because rendering is a rather intensive process. When your video is played back, it will play back in real time.
Once your video is done recording, you are given a few different options. You can open the folder that your video is saved to so you can go check it out, or you can upload it directly to YouTube. If this is your first time uploading to YouTube, there is a short process that the game will walk you through. This only needs to be done once though. After you have authorized automatic uploads to your account, you won't have to do it again.
